Monday, August 2, 2010

50's with a twist


I like making these for some reason. Maybe it's because I love the fit and I can make them in cotton, which is washable. Maybe it's because they just look so classy in their 50's way. I will admit that when I wear mine with my sandle wedges, I suddenly go into cleaning mode, complete with the happy 50's music playing in the back of my head. What's more, I tend to enjoy it. Scary, no? But I digress.


I just like making these dresses. I made 4 of them before I posted the custom listing on etsy. And then someone wanted me to make one of these, with just a few modifications: she wanted it shorter, and with a bandeau style front. Shorter is very easy, of course, and it turned out that the bandeau front was fairly simple as well, once I made a mock-up. Essentially, I made the cups as usual, to provide a good backing to the bandeau. The bandeau was taken from a Simplicity pattern that had the top I was looking for. I had to fiddle with it a little bit to get the narrow hem (at the keyhole) in the right spot, and I cut each side of the bandeau about 1.5 inches longer than the pattern pieces so I would have enough fabric to work with. This is what I ended up with:


I like the skirt in the last photo here, because the light makes it look luminescent without being see-through. It's been packed up and put into the mail, now. I hope she likes it.


Sunday, July 18, 2010

Gold! (trousers)

Funny how just when I think about leaving town people all of a sudden want me to sew lots of things for them. The same thing happens at work on sunday at 4:15. Twice as many people come into the store as have been in there all day, wanting things. Ah well. Business is business, and plane tickets don't pay for themselves, so I might as well get down to it and use my time constructively.

One commission I have for this week is a pair of gold trousers. ... When I consider the things running through my head that I want to eventually put in my closet, I can't find fault with it (we just got in this new suede-finish silk fabric into the store that I want to make into a dress that I saw in The Duchess... You know, that blue one with all the fox fur? Wouldn't that be pretty if one could find a good substitute for real fox?) Sorry, shiney thing moment. Where was I? Oh, yes. Gold pants. They are going ok. I'm about half done with them at this point. They are going to be made out of liquid gold fabric, which is this knit stuff with a moderate amount of crosswise stretch, but not so much stretch in the length. The stretch is a small problem. The shiney side also sticks to the throatplate and the foot, and I'm scared to iron the stuff at more than a 3. To make it easier to handle, I am mounting the fabric on regular polyester lining fabric before sewing the pieces together. This will make the resulting garment a little more heavy, but will also keep it from being see-thru, as this stuff is wont to do.

So far, I have managed to put the pockets onto the fronts and install the zipper. That zipper is now sewn in seven ways to Sunday. If it falls out, there is something very wrong with the world. The size I need is between two sizes, so I'm making the larger size and plan to alter things down a little at the center back seam, and possibly through the pleats up front. All the pieces are serged finished so I won't have to worry about them going into the wash. I am leaving off the back pockets, partly because they will take some time to get right (I can do welt pockets. That doesn't mean I like doing welt pockets). Also, given the thin nature of the fabric, not having back pockets may help the garment hang better. And if I get things wrong, this fabric is very unforgiving and will leave holes if I rip out seams. Holes are bad.

At this point I need to sew darts in the backs, sew the backs to the fronts, sew the crotch seam, put on the waistband and hem the pants and I should be done. I should have some time tomorrow to get this done. So, hopefully tomorrow I can give the lady her gold trousers. Should be a good thing.

Saturday, July 10, 2010

Notes on a 10 year old corset


About ten years ago I was in a costume making class in college. Since I was already pretty good at sewing, I had my pick of what I wanted to do for a sewing project, and I was getting interested in corsets at the time, so this was a pretty natural thing for me to pick. For a pattern, I copied the 19th century corset out of The Little Corset Book and did a couple of fittings with muslins before cutting it out. The base layer is cotton coutil from http://www.farthingales.on.ca/ and the top layer is some sort of polyester satin that was in the stocks in the costume shop at the time. Sandy found me the black flat lace trim somewhere. The bones are white coated steel. I used commercially available single-fold bias tape to finish the top and bottom of the corset. I believe the grommets were also from Farthingales. I didn't follow any specific directions while making this. I made it 2 inches smaller than my waist, just as everyone tells you when you make one of these. It ends up being an underbust corset. I have worn it occasionally for the past ten years, for up to 8 hours at a time. It has been washed once, by hand. It is getting quite worn now, so I thought I'd post some pictures of where the worst of the wear points are.

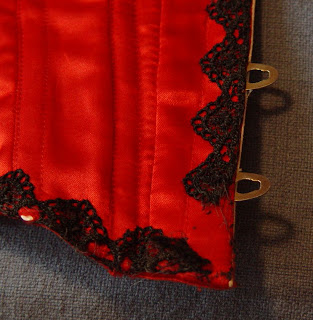
It was not very long before the lace started to wear out and come off. You can see where it's worn out here on the front corner. The wear is especially bad on the knob side of the front:The lace has almost totally flaked off in small particles all the way down the knob side. Not sure why it's particularly bad in that spot, but the deterioration is particularly noticable, and started within the first year. You can see the place at the top of the corset on that side where the flaking first started, where I reembroidered it back in with some regular sewing thread during a particularly long read-through of a play I was in at the time:


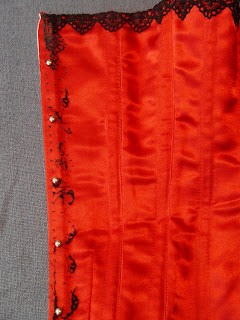
One reason people tell you to make a corset at least 2 inches smaller than your measurements is that the corset will stretch. This certainly happened with mine, and the strain has created stress points at the sides of the bone casings. This is the worst one:

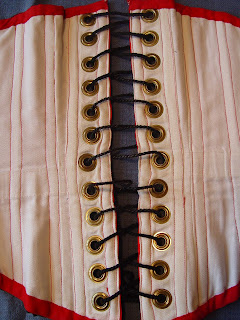
I have always had a particularly long lacing in it. After 10 years, the cord is still fairly intact, though not as shiney. There is some wear in the satin under the cord, and one or two of the grommets have started to pop:


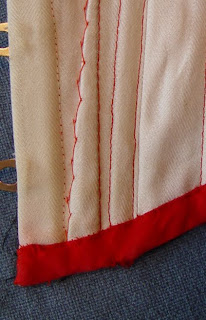
When I made the corset, I assumed that a good way to finish the top was to bind the raw edge down to the inside with bias tape, so that's what I did. Unfortunately, that made the corset a little shorter than I wanted it. But, I sewed it down really securely, and it hasn't come out on its own in 10 years.


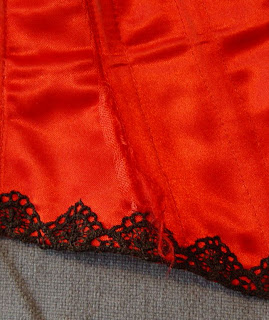
One drawback to binding the edge of the corset this way, and to using bones that were slightly too long, is that now a good number of them are popping out of the end of their casings:
I did a slight alteration to it when I had my internship at the La Jolla Playhouse. Whenever I would wear it, the bottom of the front would flip up slightly. The ladies there suggested I put a dart in the front to help simulate a spoon busk. So that's what I did here. It does indeed keep the front from flipping up:
So, I suppose the best advice I can give for people thinking of making corsets is to keep the top fabric ever so slightly larger than the coutil, bind the raw edges over the top with double fold bias tape, stitch a dart in the bottom of the front, and don't make the bones too long.

Thursday, July 8, 2010

Something modern for a change

A friend of mine is attending a wedding in a month and I thought it might be fun to make her a dress. So, I perused the various pattern books at work and for some reason really liked one from Vogue (number 1104). It's from a modern designer (Anna Sui). It's not what I usually make or am drawn to, but I figured, what the heck, it's been a while since I've worked in chiffon, and I might just have all the materials I need for this anyway except the buttons. This is what I made:The only change I made to the pattern was to slash it near the bottom and add 2 inches to the length, otherwise the bottom ruffles would just barely have met the kneecap. The shell is silk chiffon, the ruffles are crinkle silk chiffon, the lining is silk lining fabric, and the buttons are shell. I cut it to a pattern envelope size 10.


Chiffon is difficult to work with, and I knew this beforehand. The twisted nature of the fibers means it tends to go everywhere on you, so I can't work with it when I'm hungry, tired or impatient, otherwise I'll somehow make the sewing machine suck it down into the bobbin housing where it will get covered with linty grease. This is especially true of the green I used for the ruffles, which is crinkle chiffon, and therefore twice as difficult to sew. The advantage of crinkle chiffon is that if the thing you make ends up being too big, you can point your steamer at it, and it will magically gather in all it's little pleats, making the item in question narrower.

The crinkle chiffon was difficult to hem on the ruffle parts, because they are circle cut and therefore have a lot of bias cut sections which are most unruly. When I put the edges of them through the serger set on a narrow rolled hem, the machine quite neatly sheared the edge off and ignored the fact that I actually wanted it to wrap the edge in thread. Even doing the traditional narrow hem resulted in a very wild, curling hem that I didn't like. So I ended up ironing the hem up, zig-zag stitching it on the fold, and trimming away the excess.


The belt came out fairly well on this. I was able to serge off the long strait edges to finish them. The ends I had to narrow hem the regular way because they were cut on the bias.


Overall, I don't think this was my best piece of work, and the materials were a pain in the rear to try to get them to do what I wanted. It took me a long time to get it made up reasonably well. It got some fabric out of my stash. I don't know if I or my friend will ever really want to wear it. It is, however, wearable on the right person I imagine that person to be tall with long legs and stunning hair.


Thanks for modelling the dress, Froggi!

Friday, July 2, 2010

Gwissgoedd

...just watching Dr. Who. The dvd of the last few episodes of season 4, David Tennant's video diary. Saw it on an umbrella. Apparently it's Welsh for "costumes". Hope I spelled it right, no offense to anyone who takes pride in anything Welsh.

Wednesday, June 23, 2010

Elizabethan gown simplicity #8881: Ren faire notes

Well, I went ahead and did it. I actually wore this gown to the St. Louis Renaissance faire in late May. Yup, the whole thing, for the whole day. Geoff and I got into the parking lot at about 10:15. I was wearing an alternate outfit, chemise underneath, with the dress in the back seat, since the farthingale is very difficult to sit in when riding in a car. We put up the sun shade and I started getting dressed in the car. I will say that having the chemise on in the first place made things easier, since it's a lot more modest than some modern garments. Once people parked cars on either side of us and went into the faire I didn't have people looking into the car. It took about 10 minutes to get into the whole thing. I had a little bag to hang on my wrist with a few of my things in it. It is also worth noting that the week before I had sewn a guard to the hem of both the overskirt and underskirt. This guard in Elizabethan times was a strip of fabric sewn to the hem of the garment to keep them from getting soiled; those pictured on dresses in The Tudor Tailor are made from black velvet. My question was, if velvet was so expensive, why would you make it into long strips to keep your dress out of the mud? I wasn't sure, and I didn't want to spring for a couple of yards of black velvet if I was going to trail it in the mud, so I took apart an ugly 80's dress made of black corduroy and tore the skirt into strips 4 1/2 inches wide. I turned down one long edge and serged the other edge, then encased the bottom of the hem in it, thread-basting it down with long stitches in black thread. I figure this was at least accurate to the spirit of the times when they would recycle old garments into new ones. To protect the underarms of the bodice I put in disposable pit guards-- not historically accurate, but perfectly sensible, given the 89 degree weather. Also historically anachronistic but absolutely necessary was the blue Nalgene bottle filled with water. And my deck-stain spotted running shoes, but you couldn't see them unless I actually lifted my skirt.

I wore the dress the whole day, from the time we went through the front gate to about 6:00 in the evening when the faire wound down. We walked around most of the day, saw a few shows, ate a few snacks, and drank the entire contents of the Nalgene bottle at least twice. Yes, it was very hot. During the midday joust I did have sweat pouring down my face and dripping into my socks. Any sweat collecting beneath the bodice didn't really have anywhere to go except into the chemise, which is of course what it's there for. The bodice and sleeves felt a bit like a sausage casing. The hoops of the farthingale allow for some airflow if you can pick the edge of the skirt up to a cool breeze. The trick with all this sweating is, of course, to keep drinking water. However, you can't drink so much as to make you want to go to the privy, because the dress won't fit comfortably through the door. This is a very fine balancing act.


Socially, one of the first thing you notice if you go to a ren faire in a dress this big is that people start to assume that you are one of the actors. As such, vendors don't tend to try to sell you things, and lots of people want to take your picture. Geoff was in t-shirt and jeans, wearing his Aussie hat and carrying his camera. He didn't get approached much by anybody. Not quite sure why. If asked what I was, I said I was simply a traveller from far away. This evolved into a noble lady from Alsace-Lorraine by the end of the day-- the ren faire has a French theme. It wouldn't do to call myself Queen Elizabeth (even though some people thought that's what I was trying to do), and since I was not on the court I couldn't say I was from anywhere particularly close to Paris. Not having done any historical research into personages or political climates for the early part of 16th century France I kinda had to wing it. When people asked about my ruff, I said I had travelled to Holland. According to Janet Arnold's book, the first starched ruffs were recorded in England as early as 1546, having travelled there from the low countries. I'm assuming that ruffs were being made in Holland for years before that, but I'm not sure when they would have come into France. My gown was lighter in color than those of the court; darker colors denoted wealthier people because darker colors are harder to obtain, especially vibrant reds and true purples. I was, however, the only one using very fine linen and smooth silk. I noted some pearls on other costumes, some with quite a lot of pearls.

Since it hadn't rained for 3 or 4 days, the faire grounds were dry but not full of powdery dust. Some dust did get on the hem, but the guard seemed to keep it from rising far up the skirt. It was as if the corduroy sucked the dust into itself, so that when I came home and took the guard off to wash it, there was barely any sign of a dusty ring above the guard. It was a sunny day, so I wore a lot of sunscreen on my face. I figured that would leave a bit of a greasy ring on the partelette, but I think I got it scrubbed and washed before it set in. Since the partelette was between my skin and the neck ruff there was no visible soil on the ruff, so I didn't bother cleaning it. The sweat guards under the arms seem to have done their jobs admirably, because there were no sweat stains or odor at the end of the day. The chemise also seems to have done it's job well. It was interesting to note that when I took the gown off at the end of the day the chemise felt dry, despite all the sweating I had done. Linen is a remarkable fiber that will absorb up to three times its weight in water. I knew that when I made the chemise, but I didn't fully realize that would be the effect; I thought the fabric would feel moist.

So: velvet-types suck up dirt and keep it from going anywhere, and linen sucks up sweat and keeps it from going into more delicate fabrics.

The farthingale did give me some trouble getting through doors, and I didn't attempt to go into the privy with it, but it is possible to walk around in one for extended periods. When walking uphill I pushed the hoops forward from the back so I wouldn't step on the skirt. It's hard to get a good grip on the things while still appearing graceful because of the number of layers. Sometimes it's necessary, though, like when you try to sit down. The trick is to pull up a couple of hoops and sit on the edge of the chair, on the hoops you pulled up so your skirt doesn't flip up. This is rather uncomfortable for long periods of time.

Generally the response was positive. There were several nice people who took pity on me and fanned me. One nice lady helped tie my shoe (it's very hard to bend over in a steel-boned bodice). Even the court was nice and invited me to sit in the booth with them for the final joust. People were just generally interested and liked to strike up conversations about this big ginormous dress. If I do this again next year, I'll probably bring a recently aquired metal drinking cup, to get the Nalgene bottle out of the picture. I'll see if I can get ahold of some comfortable footwear that doesn't look too out of place. And I'd like to see if I can make Geoff an outfit he'll actually enjoy wearing. This will be challenging; he doesn't like to be too hot. Well, it bears thinking anyway.

Sunday, April 25, 2010

Now on Etsy!!

Hi! I now have an etsy store:

I am slowly but surely taking pictures of all the things I have made and want to sell. Once that gets done I'm going to try to get some of those things made that I always wanted to make but don't have a good excuse to wear and probably post them there. So far I have some girls' dresses and some simpler costume items up, as well as some of the Kinsale cloaks I've made. Here's a picture of one:


As per the terms of agreement, this item is on sale through etsy only. Contact me there if you're interested. Please come browse! Etsy is a great concept, and there are a lot of people there doing some fantastic stuff!

Wednesday, March 31, 2010

The finished outfit...


Here it is:


The French hood is from a current Simplicity pattern, made almost according to the pattern instructions, but I did make a built in hair bag out of handkercheif linen and attached it to the veil before I sewed them both into the hood. You can probably see the bottom hoops out of place on the one side of the skirt, probably because the poor things have been hung up for so long and are a little out of shape. A little spray with some water and some time on the floor overnight should clear that up. The neck ruff looks best in the top and bottom pictures; after a few pictures I took the ruff off to see if I could help Geoff with the camera and put it back on wonkey. Overall I am pleased with it; wearing it even for a few minutes did make me feel a bit more like I could step back into that time. And yes, the ruff and hood is what does it. You look down at the skirt and see the perfect starched sets of this archaic bit of clothing in your field of vision and feel like you could be in court. Just a little.
A side note, this is a picture that Geoff took of me while I was still squirming to get into the bodice. It shows how I quickly put up my hair, winding it in two ropes around the back of my head. This was quick and easy to put in with some bobby pins. A more period accurate and probably a more solid way of doing it is outlined in The Tudor Tailor.


I don't know how many hours I spent on this dress. It's probably somewhere in the range of 150-200 hours, with all the beading and hand sewing I did. I don't even know what I'm going to do with this thing now that it's all together. I have contemplated selling it on etsy, but would anyone buy such a thing? Especially given the price tag I'd have to put on it to get a decent wage from it. I shall have to ponder this some more.

Monday, February 8, 2010

Simplicity #8881: Ruff goings

I won't bore you with details of what I've been doing for the past 3 months of not posting to my blog. I will say though, that several things have inspired me to pick up the detail work on this dress again. I have applied for a (paying) stitcher job at a local theater, and they have actually called me back, so I would like to have something impressive to show them if I get that far. The second is that I've met a few of the actors and volunteers in social situations. So I guess I want my outfit to look good because they might actually know something about period clothing (hey, everyone's got a hobby). Also, other people connected with the local Ren Faire are coming into the fabric store where I work and buying cloth to make their outfits, and some of them definately know what they're doing. So it might be fun to show up in a big, fancy outfit and talk shop.
So, the main reason why I stopped for so long last time was that I was having problems starching my ruffs. I had made up one of the sleeve ruffs just to see what I was supposed to be doing. I made the wrist band of two pieces of the finest handkercheif linen I could find with a piece of Irish linen sandwiched in between as interfacing. The pieces were eight and a half inches long by one and one quarter inches wide. The ruffle was cut from the same handkercheif linen; the piece was 1 3/4 inches wide by 45 inches long. Because I wanted to follow Janet Arnold's instructions from her book, Patterns of Fashion 4, I knew I had to make the entire thing out of linen (the instructions on the traditional starching of ruffs include baking them in the oven until they are dry and hard--linen will withstand high temperatures that will scorch other fabrics). Since the only linen thread I could get was a hand embroidery thread, I had to construct the ruff by hand. After finishing the edges of the ruffle, I cartridge pleated it into the wrist band with the help of some tiger tape (9 stitches per inch). I sewed the wrist band facing in place, turned it out, and whipped the band shut. I then took a stitch through the base of each pleat where it meets the band and whipped it into the band so that the ruffles would tend perpendicular to the band. This was the easy part.

The hard part was getting the proportions of starch right, and then getting the starched ruff to set right. I started off making half a batch of starch as outlined in the book, using potato starch, but the product was much too thick for me to work with, and tended to lump up. I ended up adding more than 3 times the amount of boiling water the original recipe called for. I then duely swished the ruff in the gloop, squeezed out the excess, pinned it to an oven rack and baked it with the oven door full open (good thing it was cold outside). The instructions don't say what temperature to set the oven at, so I started at 250 degrees F. It took upwards of 20 minutes for it to dry hard enough to make me think it was done. When I took it out, I was disappointed to see that the starch had clumped, forming hard lumps in places that instantly wanted to glue themselves to my steam iron. Since I had no poking sticks from the 16th century, I tried shaping the sets with my iron and the handle of a wooden spoon. This was very cumbersome, as the iron was so large as compared with the ruff, and the sets were not very satisfactory because they were not smooth. It was very difficult to heat the handle of the spoon hot enough to give the sets a good shape. So, discouraged, I put the project away to rethink my methods.
Several months and a lot of pondering later, I had worked a couple of things out. The main problems to work out were the starch solution and what to use for a suitable poking stick. The starch solution was much too strong and gloppy, so I watered it down quite a bit on my next batch. I started out with about 2 tablespoons of potato starch in a pot on the stove. I kept adding boiling water from a kettle, cooking and stirring it until it was a smooth, fairly runny consistancy, quite a bit runnier than the lemon base of a homemade lemon merangue pie. I put my first ruff attempt in a pot of boiling water to try to remove the previous starch, and added my second sleeve ruff, and let them boil together. Then I dunked both of them in the new starch solution and proceeded as before. This time I put the oven up to 350 degrees and closed the door, watching carefully through the window. The ruffs were dry in less than 10 minutes. The first one that had been starched and then boiled was still harder than my second, but with no large patches of starch to gum up my iron. The second ruff was a slightly softer set, but still acceptable.

The poking stick problem vexed me greatly for a while until I stumbled across the solution at work. While putting away some shipment, I passed by the display of clover Mini Irons and had to stop to take a closer look. I realized that the wand-shaped original clover Mini Iron was just the right size for the tiny sets I wanted. To use it, I simply had to remove the sole plate with a screwdriver. In doing so, I discovered that there were 2 screws on the end of the metal cylendar, only one of which came off, but I was still able to maneuver it enough to be able to use it to iron the sets. I found that if I set the iron on high the starch would scorch brown, but medium still provided enough heat. Getting the sets even was still challenging, but after some practice I was able to get a halfway decent result.

You can just barely see in this photo the scorched starch on this sleeve ruff.
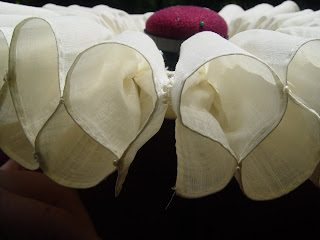
With the ruffs set, I sewed a snap onto the band of each and thread basted them into the cuffs of the bodice sleeves.

For the neck ruff, I knew I wanted to have the sets very even. I also knew I wanted to have a deeper ruff than the 1.5 inches set out in the original pattern. I eventually cut my linen to end up with a 14 foot strip 3 inches wide, hemmed with a hand-sewn narrow hem. I cartridge pleated it as for the sleeve ruffs, at every other dash on the tiger tape (9 dashes per inch). Instead of putting it together and then dunking it in starch, I starched the frill before setting it into the band, using Mary Ellen's Best Press. This is a light starch alternative. I found it kept the frill quite soft (softer than I wanted for this application), but it was easier to use than the potato starch, and doesn't leave gick all over the underside of the iron. After I starched the frill, I chalked out a mark every 3 inches on the hemmed edge, then drew a thread through them as if in a long basting stitch. When that thread was drawn up, I had very evenly sized sets. After setting the frill into the band, which took a long time in this state, I pinned the sets where I wanted them to lie and sewed a seed pearl at the intersections with a waxed linen thread. These pearls would have to be removed if the ruff was ever restarched, so I didn't knot the threads. The beeswax is sticky enough to keep the threads in place. After storing the ruff for a few months in a box, I discovered that the Best Press wasn't holding the ruff sets securely enough, and I didn't want to wash it all out, cook it in gloop and try to get all the little pearls back in the right spots (because they would surely need to be removed to launder and bake the ruff). So, after purchasing a 3/4 inch curling iron and a can of Niagra Extra Strong starch, this is what I ended up with (4 coats of starch, letting the starch dry between sprayings):

So, using the traditional method of potato starch takes practice to get it right. If I was to do it again, I might perhaps brush potato starch onto a wet ruff with a paintbrush to see if that kept it from glopping up and burning my fingers. Marking the sets and drawing them up with a thread seems to work nicely, as does setting the smaller sets with the wand of a mini iron. A stronger spray starch will do in a pinch as a substitute to potato starch, but I will save the rest of the Mary Ellen's for a different purpose.


Saturday, October 31, 2009

HAPPY HALLOWEEN!!!!


Grumpy pumpkin says: Get off the lawn, you kids!

Taken last year in Old Town St. Charles.

Friday, October 23, 2009

Simplicity #8881: Elizabethan gown almost finished


I'm posting a few pics of the dress as it is without the ruffs. I think it looks pretty good as is, but I'm still going to try to get the ruffs right.

These pics were taken by my husband with his new camera, which I got him for our 5th anniversary last week. Also, he helped me do up all the hooks and such in the back of the bodice which I can never hope to do up myself. :)

Monday, October 5, 2009

Elizabethan gown: Simplicity #8881

Part 4: Hemming and Hawing

Well, it's been over a month since my last post. Work on the dress has been going slowly, mainly because work of a (monitarily) gainful nature has been aboslutely nuts and making me work a lot of evening shifts. In order to keep myself sane, I needed to convince myself I was finishing something. So I decided that the best thing to do was to finish several smaller projects, that way I could look at a small pile of "done" items and hopefully trick myself into thinking that things weren't all that bad. I was working 50 hours a week between two jobs and not really seeing my husband, who was also stressed out at work. So, things were generally not happy. I did, however, finish a crib-size quilt made from a batik jelly roll, put the finishing touches on that Civil war ball gown I started last year and never finished, and three knitting projects, as well as several repairs to pieces of clothing. But enough of this. You're not reading my blog to hear me complain about my situation. You want to read about this dress...

I started hemming the skirt. Since this is long, somewhat tedious work, I'm just doing one panel at a time, from one seam to the other per day. Each layer of skirt needs to be hemmed by hand, and I am doing so with a single waxed silk thread. I am turning a 2 inch hem on each layer, not bothering with turning the top under or attach a hem tape, because I have serged the edges of both layers. It is going about how you'd expect.


I moved along to the bodice shortly after finishing the last major construction on the skirt. I took 2 layers of percale of the same sort as Susan's Farewell dress (see first two posts on this blog) and used them as the underlayers, stitching boning channels and marking dots and symbols on them. This is a strong material, and I want this bodice to hold up. After stitching channels and cutting bones, I decided to put a layer of thin quilt batting in the front of the bodice, between the boned layer and the outer fabric. It's only a thin layer of cotton, but it helps to puff out the main fabric just slightly, and it also helps hide the boning inside. I thread-basted the pieces of the front sections together along the center seam, then laid the sections over my thigh to get them to curve, so when I basted the other side together it would have a natural curve to it, and hopefully not get any strange lines or stress points when actually put on a body. I clipped the batting to the seam allowances, to reduce excess bulk. After basting the peices of each front together, I finished the edges that would not be bound over by piping binding by binding over them with bias strips of china silk (dressmakers' or Hong Kong finish). I had gotten the peach china silk from Thai Silks from their shop in Palo Alto. It was a remnant of about a yard long. I think I got it for less than $5. After lots of basting and binding, I sewed the bodice pieces together as per the envelope instructions, and bound off the top and bottom edge with piping binding covered with the same green silk as the skirt. Here's a picture of the inside:
Rather than slip-stitching the edge down as specified, I used a tightly spaced whip stitch. You might not be able to see it in these pics. I take most of them with my camera phone. I have found that through much wearing the slip stitch tends to come out, while a small, tight, even whip stitch will stay put and still be fairly unobtrusive. And, people in 50 years looking at your nice, even, miniscule whip stitches will think you were nuts and wonder why people don't do that kind of workmanship anymore. Heck, your contemporaries will think you're nuts. I sewed the hooks to the back, plugged in the sleeves, and tried the bodice on with the rest of the outfit. I found that the bodice shoulders kept slipping off, mostly due to the tightness of the bodice sleeves. I find my upper arms are a little larger around than average, and adding about half an inch into the width of the sleeve helps things fit better. After letting out the underarm seam I felt better able to move in the bodice, but it was still a bit loose in the shoulders. Since the partelett was made to snap into the neckline of the bodice, I figured that this would help hold the shoulders up.

The partelett was made from the handkercheif linen I found at Jackman fabrics, one of the independant fabric stores here in the St. Louis area. I bought three and one quarter yards of it, unsure I would be able to find anything else suitable anywhere else (I did my usual several days of google searching and sitting on eBay for weeks, and didn't find anything else more suitable). I really wanted pure white linen lawn or organdie, but this is rather hard to find. I'll say more on this when I do the ruff. The neck liner was made from a scrap of silk organza I had left over from another project, with some white decorative cord to close it at the neck. This is the linen here:

So, it seems that all I have left to do is make the ruffs and figure out how to starch them and set them. I will begin with the wrist ruffs to perfect the tecnique and then decide what I want to do with the neck ruff.

Sunday, August 23, 2009

Elizabethan gown: simplicity #8881

Part 3: Of reeds and sleeves
I went ahead and ordered the boning for the farthingale this past week. I figured since it had been my birthday and I was forced to work a closing shift, I would go and buy myself a present :) I had read in The Tudor Tailor that farthingales used to be boned with reeds, and I wondered what that would be like. Their instructions called for soaking reeds in a bathtub overnight, then binding them into the desired shape and letting them dry. I was a little bit sceptical about the whole process, and about the finished product. From the instructions I knew I would need reeds in lengths up to 123", and knew I couldn't completely submerge something that long and strait in my bathtub. And what about the finished product? Baskets are made from reeds, and any of them I have handled have been rather rigid, and sometimes brittle. I didn't want a brittle hoop inside a farthingale: I'd never be able to get it through a modern door. And if I do end up wearing it to the ren faire, I don't want an overenthusiastic reveler to break my hoops if they happen to run into me. However, I thought for the price I would give them a try. I found them on http://www.grannd.com/ for $8.99 for 90 feet of 1/2 inch flat oval reeds. I knew they would probably come in sections ( I don't know of any reed that grows to 90 feet long), but wasn't sure of anything much beyond that. Just to be on the safe side, I ordered one roll of plastic covered hoop steel (12 yards for about $25) and figured that if the reeds didn't work out, I'd only be about $10 worse off, and the steel I already had could go into the top hoops while the proper crinoline steel would go into the bottom hoops to help keep the bottom from collapsing.

What came in the mail on friday was a total surprise (in a good way). After extricating the package from the very stubborn mailbox, I thought they must have shipped the steel and the reeds in separate packages: the one box was a fairly standard size but very light. When I opened it, I found the steel and the reeds, both wound in tight coils. I set the steel aside and gently opened the reeds, which did spring out a bit, but not terribly far and not with deadly force like spring steel. There were indeed several pieces present, but they were all fairly long: ranging in length from 68" to 160", very useable lengths for the farthingale. And, since they were already coiled, I just started measuring canes and putting them into appropriate channels in the farthingale. I didn't even bother to cut off the longer ones, simply slipping the extra length into the boning channels. They didn't have any splinters, but they had a certain roughness of the grain. This didn't impede my sliding them into the boning channels (except the two at the very bottom were a little hard to shift around), and seemed to keep them in place without drilling holes in them to tie them off. When I did get all of the hoops in, I found that they were a little too curled, and the hoops in the bottom were curling and warping quite badly. From my experience woodworking, I knew that wetting them would help them relax and straiten, so I sprayed the hooped farthingale with water, laid the whole thing on the floor with the hoops in concentric circles, and let it dry overnight.

In the morning, I found the farthingale just as I hoped it could be. The reeds had dried in the casings, and were now the right shape and rigid enough not to buckle under the garment's own weight, but still flexible enough to squeeze through a door. I put the underskirt over the farthingale and bumroll to see if it would collapse, since the underskirt is slightly heavy. It did not collapse. This bodes well for when I get the overskirt done. Yes, it does swing just like a regular hoopskirt, so I might have to rig up some sort of bloomers in case of high winds. Arnold pictures some portraits of women wearing an Elizabethan form of bloomers in her book, so that detail might have some historical accuracy, though I will have to look at the book again to figure out who was wearing them. This is what the front of the overskirt looks like over the fully boned farthingale, looking down.

Progress on the overskirt has been rather slow, and so far pretty much as per the instructions. The trim on the front edges is taking a long time because, of course, I'm sewing it on by hand. I am sewing on two strips of 1" wide gold-tone trim, and I am sewing freshwater pearls in each of the spaces between them.


Also I am sewing lapis lazuli chips on each strip of trim. Each pearl and chip is individually knotted. It has taken me the amount of time it takes to watch Pride and Predjudice (Colin Firth version) twice to sew the trim and various stones on one side.


I am now working on the other side, and have the trim and pearls sewn down. Like the underskirt, I am not sewing pearls to the final 6 inches of the overskirt until I know how much to turn the hem up. The only other deviation from the instructions was in the cutting of the front panels: since the fabric was 54"wide, it did not have to be cut in two pieces. I simply lapped the small wing piece onto the main pattern piece and pinned it temporarily to obtain the full size pattern piece. I have done the cartridge pleating on one side as well, and am hopeful I can get the rest of the detail work done soon so I can put the whole skirt together.

Also last week I made the sleeves of the gown. Sometimes I will work on pieces of a project so that I will do a good job on the details earlier in the project while I'm still interested, and at the end I can put all the finished pieces together when I am really impatient to see the thing done. Since I didn't read the instructions really well, and since I had done things a little differently a the La Jolla playhouse, I deviated from the printed instructions just a bit. I used the green silk for the base of the sleeves with polyester organdy for the overlay, and then I cut a lining of that same cotton/poly broadcloth I used for the farthingale. I sandwiched all the layers together; broadcloth, then silk, then polyester, and serged it together on all sides. Using the layer of broadcloth as the base makes it a bit stronger, giving the sleeve a good base to sew the lines of trim on, as well as giving me a good canvas to mark out for the placement of the trim. I sewed the trim lines on by machine with a zigzag stitch, then put the pearls on by hand, individually knotted of course. I did not sew the six lines of trim to go over the puff, though, because I did not think the trim I had would look good. Once I had the puff on, I sewed 4 lines of czekosloviakian faceted glass beads on each puff, just to give them a little interest. I serged off the top edge of the sleeve, puff and all, so it will be easy to stitch into the armscye of the bodice. To finish the cuff of the sleeve, which I did not finish like the instructions said, I simply bound it off with a strip of white bias tape and cross-stitched it down. I hope when I make the cuff ruffs that I will be able to baste them temporarily to the ends of the sleeves onto that bias tape to keep the silk and organdy clean on the outside. I sewed a pearl to the end of the slit as well, to keep the stitches from pulling out.


Hopefully this coming week I will finish the overskirt and be able to attach it and the underskirt to the waistband, and make a start on the bodice. It will take a few days to cut and tip the bones once the bodice is assembled. I should find some thin wool flannel or the like to put between the bones and the silk so the bones won't show. And I am still having trouble finding the linen lawn that I'd like, though my boss at the fabric store says he'll try to find me something he can order for the store. We'll see what happens there.