Funny how just when I think about leaving town people all of a sudden want me to sew lots of things for them. The same thing happens at work on sunday at 4:15. Twice as many people come into the store as have been in there all day, wanting things. Ah well. Business is business, and plane tickets don't pay for themselves, so I might as well get down to it and use my time constructively.
One commission I have for this week is a pair of gold trousers. ... When I consider the things running through my head that I want to eventually put in my closet, I can't find fault with it (we just got in this new suede-finish silk fabric into the store that I want to make into a dress that I saw in The Duchess... You know, that blue one with all the fox fur? Wouldn't that be pretty if one could find a good substitute for real fox?) Sorry, shiney thing moment. Where was I? Oh, yes. Gold pants. They are going ok. I'm about half done with them at this point. They are going to be made out of liquid gold fabric, which is this knit stuff with a moderate amount of crosswise stretch, but not so much stretch in the length. The stretch is a small problem. The shiney side also sticks to the throatplate and the foot, and I'm scared to iron the stuff at more than a 3. To make it easier to handle, I am mounting the fabric on regular polyester lining fabric before sewing the pieces together. This will make the resulting garment a little more heavy, but will also keep it from being see-thru, as this stuff is wont to do.
So far, I have managed to put the pockets onto the fronts and install the zipper. That zipper is now sewn in seven ways to Sunday. If it falls out, there is something very wrong with the world. The size I need is between two sizes, so I'm making the larger size and plan to alter things down a little at the center back seam, and possibly through the pleats up front. All the pieces are serged finished so I won't have to worry about them going into the wash. I am leaving off the back pockets, partly because they will take some time to get right (I can do welt pockets. That doesn't mean I like doing welt pockets). Also, given the thin nature of the fabric, not having back pockets may help the garment hang better. And if I get things wrong, this fabric is very unforgiving and will leave holes if I rip out seams. Holes are bad.
At this point I need to sew darts in the backs, sew the backs to the fronts, sew the crotch seam, put on the waistband and hem the pants and I should be done. I should have some time tomorrow to get this done. So, hopefully tomorrow I can give the lady her gold trousers. Should be a good thing.
Sunday, July 18, 2010
Saturday, July 10, 2010
Notes on a 10 year old corset


About ten years ago I was in a costume making class in college. Since I was already pretty good at sewing, I had my pick of what I wanted to do for a sewing project, and I was getting interested in corsets at the time, so this was a pretty natural thing for me to pick. For a pattern, I copied the 19th century corset out of The Little Corset Book and did a couple of fittings with muslins before cutting it out. The base layer is cotton coutil from http://www.farthingales.on.ca/ and the top layer is some sort of polyester satin that was in the stocks in the costume shop at the time. Sandy found me the black flat lace trim somewhere. The bones are white coated steel. I used commercially available single-fold bias tape to finish the top and bottom of the corset. I believe the grommets were also from Farthingales. I didn't follow any specific directions while making this. I made it 2 inches smaller than my waist, just as everyone tells you when you make one of these. It ends up being an underbust corset. I have worn it occasionally for the past ten years, for up to 8 hours at a time. It has been washed once, by hand. It is getting quite worn now, so I thought I'd post some pictures of where the worst of the wear points are.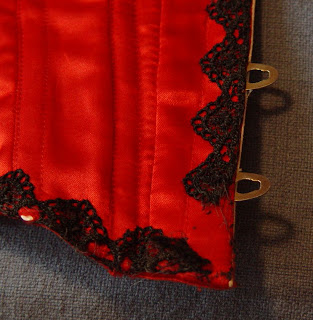
It was not very long before the lace started to wear out and come off. You can see where it's worn out here on the front corner. The wear is especially bad on the knob side of the front: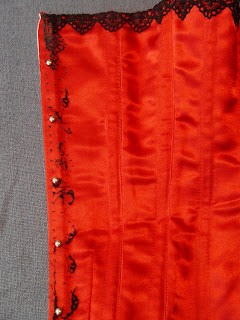 The lace has almost totally flaked off in small particles all the way down the knob side. Not sure why it's particularly bad in that spot, but the deterioration is particularly noticable, and started within the first year. You can see the place at the top of the corset on that side where the flaking first started, where I reembroidered it back in with some regular sewing thread during a particularly long read-through of a play I was in at the time:

One reason people tell you to make a corset at least 2 inches smaller than your measurements is that the corset will stretch. This certainly happened with mine, and the strain has created stress points at the sides of the bone casings. This is the worst one:
 When I made the corset, I assumed that a good way to finish the top was to bind the raw edge down to the inside with bias tape, so that's what I did. Unfortunately, that made the corset a little shorter than I wanted it. But, I sewed it down really securely, and it hasn't come out on its own in 10 years.
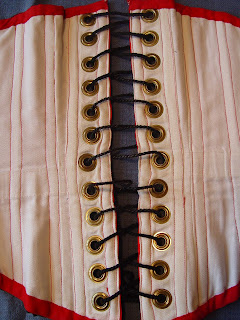
One drawback to binding the edge of the corset this way, and to using bones that were slightly too long, is that now a good number of them are popping out of the end of their casings:
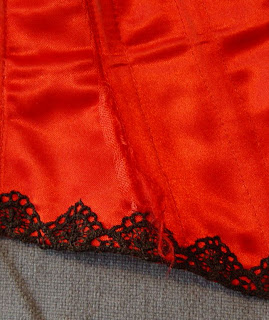
 I did a slight alteration to it when I had my internship at the La Jolla Playhouse. Whenever I would wear it, the bottom of the front would flip up slightly. The ladies there suggested I put a dart in the front to help simulate a spoon busk. So that's what I did here. It does indeed keep the front from flipping up:
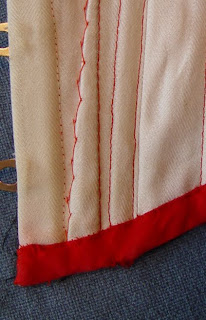
So, I suppose the best advice I can give for people thinking of making corsets is to keep the top fabric ever so slightly larger than the coutil, bind the raw edges over the top with double fold bias tape, stitch a dart in the bottom of the front, and don't make the bones too long.
Thursday, July 8, 2010
Something modern for a change
A friend of mine is attending a wedding in a month and I thought it might be fun to make her a dress. So, I perused the various pattern books at work and for some reason really liked one from Vogue (number 1104). It's from a modern designer (Anna Sui). It's not what I usually make or am drawn to, but I figured, what the heck, it's been a while since I've worked in chiffon, and I might just have all the materials I need for this anyway except the buttons. This is what I made:
 The only change I made to the pattern was to slash it near the bottom and add 2 inches to the length, otherwise the bottom ruffles would just barely have met the kneecap. The shell is silk chiffon, the ruffles are crinkle silk chiffon, the lining is silk lining fabric, and the buttons are shell. I cut it to a pattern envelope size 10.


The belt came out fairly well on this. I was able to serge off the long strait edges to finish them. The ends I had to narrow hem the regular way because they were cut on the bias.
 Overall, I don't think this was my best piece of work, and the materials were a pain in the rear to try to get them to do what I wanted. It took me a long time to get it made up reasonably well. It got some fabric out of my stash. I don't know if I or my friend will ever really want to wear it. It is, however, wearable on the right person I imagine that person to be tall with long legs and stunning hair.

Thanks for modelling the dress, Froggi!
The only change I made to the pattern was to slash it near the bottom and add 2 inches to the length, otherwise the bottom ruffles would just barely have met the kneecap. The shell is silk chiffon, the ruffles are crinkle silk chiffon, the lining is silk lining fabric, and the buttons are shell. I cut it to a pattern envelope size 10.Chiffon is difficult to work with, and I knew this beforehand. The twisted nature of the fibers means it tends to go everywhere on you, so I can't work with it when I'm hungry, tired or impatient, otherwise I'll somehow make the sewing machine suck it down into the bobbin housing where it will get covered with linty grease. This is especially true of the green I used for the ruffles, which is crinkle chiffon, and therefore twice as difficult to sew. The advantage of crinkle chiffon is that if the thing you make ends up being too big, you can point your steamer at it, and it will magically gather in all it's little pleats, making the item in question narrower.
The crinkle chiffon was difficult to hem on the ruffle parts, because they are circle cut and therefore have a lot of bias cut sections which are most unruly. When I put the edges of them through the serger set on a narrow rolled hem, the machine quite neatly sheared the edge off and ignored the fact that I actually wanted it to wrap the edge in thread. Even doing the traditional narrow hem resulted in a very wild, curling hem that I didn't like. So I ended up ironing the hem up, zig-zag stitching it on the fold, and trimming away the excess.
The crinkle chiffon was difficult to hem on the ruffle parts, because they are circle cut and therefore have a lot of bias cut sections which are most unruly. When I put the edges of them through the serger set on a narrow rolled hem, the machine quite neatly sheared the edge off and ignored the fact that I actually wanted it to wrap the edge in thread. Even doing the traditional narrow hem resulted in a very wild, curling hem that I didn't like. So I ended up ironing the hem up, zig-zag stitching it on the fold, and trimming away the excess.
Overall, I don't think this was my best piece of work, and the materials were a pain in the rear to try to get them to do what I wanted. It took me a long time to get it made up reasonably well. It got some fabric out of my stash. I don't know if I or my friend will ever really want to wear it. It is, however, wearable on the right person I imagine that person to be tall with long legs and stunning hair.Thanks for modelling the dress, Froggi!
Friday, July 2, 2010
Gwissgoedd
...just watching Dr. Who. The dvd of the last few episodes of season 4, David Tennant's video diary. Saw it on an umbrella. Apparently it's Welsh for "costumes". Hope I spelled it right, no offense to anyone who takes pride in anything Welsh.
Subscribe to:
Posts (Atom)
