Thursday, December 30, 2010

steampunkery II

Well, it's been a while since I last posted, and I haven't gotten everything done yet (but I did knit 4 hats, 2 neck muffs, a scarf and a pair of mitts for Christmas, made 3 pleated valances for a friend, made a kilt for a 7-year-old, a baptism dress for an etsy order, a pair of pants for my mother-in-law, a dress and a baby bonnet to use up scraps, and a vest for a friend), but I did get the skirt and blouse done, so here are some pictures before I have to embroil myself in some serious alterations for another friend and then fix a box of cloth diapers. *sigh* When your friends know you sew, your work is never done.

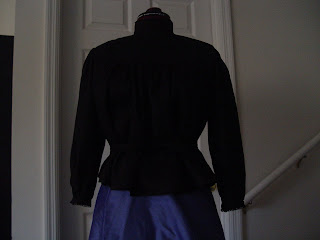
Both of these are from Folkswear patterns; the blouse is their Gibson Girl blouse, done very simply with black handkerchief linen and a little Cluny lace for trim around the blouse yoke, the bottom of the cuffs and top of the collar. The skirt is their Walking skirt done in dupioni silk I found on eBay from Fabricfreak (I think). The skirt has a shell button at the waist and a few hooks and eyes in the fly to keep it shut. The blouse closes at the back with hooks and eyes.
I had very little trouble with these patterns. The most trouble I had was understanding which way to fold the fly and facings on the skirt, and once I had ironed them down and looked at them I figured out what they wanted me to do and just pressed them the opposite way to get it right. The blouse sleeves are below the elbow, and I used the bias cuff option to make sleeve construction easy. I used the short-backed version. When it's laundry day and none of my regular work things are clean I can use this blouse as a work shirt with a pair of high-waisted pants. They have to be high-waisted, otherwise a good portion of my lower back shows, especially when I bend over. I also like to wear a black t-shirt underneath, just in case the hooks pop open (despite my best efforts of bending them closed).
These are pretty much constructed as the pattern would have you do them, but I added some French fuze to the inside waistband of the skirt because dupioni is not the strongest fabric lengthwise. I also laid the skirt out top-to-tail and cheated slightly off-grain because I had a short amount of yardage (I had a little over 2 yards of 55" yardage). Still, I managed to get the full length skirt out of it for my size (medium).
I have also constructed a petticoat out of black poly-cotton broadcloth scraps leftover from another project. With the long strips I had kicking around plus my machine ruffle foot I was easily able to construct a peasant-skirt shaped petticoat with a long front slit and drawstring waist. It is three-tiered. I pleated out a good amount of ruffle and some of it didn't end up in the skirt. So, I took the little bit of leftover and tacked it to the back in a soft bustle. This isn't strictly a bustle skirt, but fashions of the time do have a bit of an S bend to them, so the extra fabric helps fill out the back of the skirt without making it hard to sit. I may put some horsehair braid at the bottom of the bustle portion to help it stand out a little more, but that's as far as I'll go.
As the sleeves on this jacket are slightly puffy, I may want to rethink my original jacket idea and put on a slightly puffed sleeve. I'm not sure, though, so I want to make a mockup. I'll let you know how that goes.

Friday, November 12, 2010

Steampunkery

I've heard about steampunk, watched a few steampunk homemade series online, seen some steampunk jewelry books, etc, but it's taken me a while to make sense of it in my head. It's not exactly from any specific time period, except maybe Victorian. I sort of get the concept that it's what the world would be if everything was still cogs and steam instead of computers, but my mind still wants to classify it neatly somewhere in history. But you can't, because it's an imaginary reality. So what is it really?

Well, one of our gaming buddies just went to a steampunk convention and posted photos on Facebook. So, of course there are pictures of guys in suits with antique looking hats (well, let's face it, unless it's a ballcap or ski mask or some such thing, men don't tend to wear hats much anymore so anything remotely civilian-formal looking seems old-fashioned, at least), girls in anything from corselettes and modern corduroy pants to lace and panniers and anything in between. Oh, and lots of gadgets--humongous robotic hands, ghost-buster type steam-powered power packes, delicate little pocket watches and other gizmos, anything these people can think up. So, it's a hodgepodge of anything these people wanted to incorporate, and there are very few rules. The sensible, historical-accuracy seeking part of my brain, upon seeing all these photos, said, "hey, you can't do that!" But then, some other part piped up and said, "well, why not?" Long story short, I've got an idea for a steampunk outfit, and I've started putting it together.

Going by the lovely pictures in my head, it's going to be inspired from late Victorian or early Edwardian costume. What I want is a long gored skirt, slightly full in the back but not requiring a bustle or hoop, maybe just a full petticoat. Over that I want a frilly pintucked blouse with lots of lace and a high collar, probably with a little cameo at the neck, and a little fitted jacket with a long 2 piece sleeve, pointed in front and with ruffles at the base of the back. Haven't decided if it will have collar and lapels or no. And I have just the fabric for the jacket and skirt. I just hope there's enough of it. As part of the getup, I want to have a long, full apron of white twill or canvas with lots of pockets for tools. I also want to make myself one of those freakishly large hats like they had at the turn of the century, with lots of plumes on it (just not from endangered species, thank you), and one of those umbrellas like you get at Thinkgeek.com where the center stick lights up. And I can wear my white ankle boots with it! Yay! I have been trying to think of a good use for those for years, but I can't get rid of them because they are so uncommon.

Sorry, I know you can't see the pictures in my head. This is just a teaser. I have to go make this now, but I'll be back next week to let you know what I'm doing. Ta-tah!

Saturday, November 6, 2010

Beating a dead horse... Again!

If you don't know what this is all about, go ahead and read the post previous to this. Go ahead, I'll wait....

Finished now? Good.

Well, it's finished, in all it's gutsy glory;

As you can see, I added some grey fleece to the bottom of each leg, just to make it a little more proportional, as well as adding the hooves. I didn't have the time to do all of the fun things I wanted to do to it, but it's complete in itself as a comedic device. It ended up being about 5 feet long from nose to end, not counting the tail. I was kind of worried at first that it would be too ridiculously big, but I managed to fit it in a big black trash bag anyway and toss it in the trunk.

I brought it to game tonight, and it gave people a good laugh, including the guy who asked the question in the first place, so I guess I can call it a success. Hm... What crazy project will I get myself into next? Well, someone did just ask me if I could make a peacoat out of red and black fur... And someone else asked if I could make a WWII jacket... Lots to think about....

Wednesday, November 3, 2010

Beating a Dead Horse


About a month ago, a friend of ours walked into game night and asked me "Can you make me a dead horse?" Apparently, a particular topic keeps coming up in meetings on which nobody is able or willing to make any headway. This is, understandably, quite frustrating. So, he requested a plushy, cartoony dead horse he can throw on the table and proceed to beat with something, but would still be soft and cuddly. He specified something between 3 and 4 feet long, complete with X's for eyes and yarn hair. Ok, I thought. Sounds entertaining, anyway.

I figured, ok, I don't have to get terribly fancy, I just have to shoot for recognizable. So if you break it down, you can make the body and legs from cylindars, the muzzle and neck out of tilted cone shapes. The tricky bit is getting the proportions right, and this is where chance threw me a bone.
My boss came upon a fairly realistic looking horse toy in the trash one day. It was one of the things that has a rebar skeleton inside so a small child can sit on and ride it. The batteries in the sound device had worn out, and the neck seam was torn open, with the stuffing coming out. So, knowing I had this project in mind, she picked it up and tossed it in her trunk. This is it:

It's only about 24 inches tall. I had thought about pulling the rebar and stuffing out, washing him and restuffing him in a comedic way and make my life generally easier. But come on; it's two feet tall, and not even remotely ridiculous looking, and I just couldn't do enough twisted things to it to satisfy my twisted creativity. So I went to the fabric store. $42 later I had lots of fleece pieces of varying colors and lengths, two packages of large ric-rac, and a 5 pound box of stuffing.

I got out my measuring tape and started measuring various dimensions of the existing horse and writing them down on my various scribbled diagrams on cut-up paper bags, expressing the dimensions in terms of X so I could scale the horse up as desired. Then I got to measuring out and cutting various big rectangles of fleece based on those calculations, and sewing them together.

In general, the horse turned out quite a bit bigger than expected, so I suppose I got something wrong in the length of the body and the head. The legs are also woefully short, but I can solve that by sewing in socks (or pasterns, or fetlocks, I'm not sure what the classifications are anymore, merely that they exist to describe the length of the white area on a horse's legs down to its hooves. And no, I don't feel like looking them up on Wikipedia just now, either). His tail is also a bit short, but we can just say it's been docked. and yes, in this pic his legs are still unfinished, but you get the idea.

I wanted it to be clear that the horse was dead, probably by several different means. I also wanted it to be interactive, because that's more fun and twisted. So, I figured it would be pretty easy to have the horse die of hanging (just need to make the noose), disease, or broken heart. If I have the time and wherewithall, I might even work in some alien spawn and some gunshot wounds. Some of these methods show up externally, some internally. This means I needed an organ sac. I whipped up some plush intestinal tract and a heart and sewed them into a rectangular red piece of fleece.


I hope to get ahold of a little cthonid or alien to stick in there. I suppose I could also have put a small red throw blanket in there, either for a pool of blood or for a quick nap.

Our friend had wanted the cartoony X eyes. Sounds like fun, but can I take it a step further? I thought it might be fun to have an eye coming out, but to have it be detachable to help keep things easy. So, the eyespots are the loop side of velcro to keep the entire body soft, with a small bit of the hooks to keep the eye on. I made the eye by covering a styrofoam ball with a layer of muslin, then a scrap of china silk, then painting on the details with fabric paint.


I wanted the tongue to loll out of the mouth, and possibly be something to pull on. I made it from a few long pieces of lime-green fleece, and then threaded a wide piece of elastic into it and gather-stitched it down to make the back of the tongue stretchy. I extended the red of the inside of the mouth into a long pocket on the inside and stitched the tongue into the end. I then tethered the back of the pocket to the corner of the organ sac so that the tongue would hopefully retract somewhat into the body, keep itself free of the stuffing inside, and help keep the organ sac in place. I painted the tongue with some red and black bumps to make it look particularly nasty.


So that's what I've got so far. I still need to make the socks and the hooves, make a noose, and make a few other bits and pieces if time permits. For now, this is what I've got, and it's an interesting romp!


Thursday, September 16, 2010

Child's play


...Or, This Kid Should Be A Model.

So. Over the summer, Steph and I were thinking of organizing a fashion show of the kids' stuff I had done. You know the type of thing... invite a bunch of interested friends over to your house, throw some stuff on some models and see who bites. So, I made a batch of new things, got my house cleaner than I had in years, rearranged the furniture, got some light refreshments, and put on my interview frock.

And nobody showed up.

bummer. I had to eat the rest of the chips and salsa.

After a week or two (and somewhere past the why-don't-I-have-a-useful-talent-like-fixing-cars-or-something stage), we figured that, at the least, this stuff was still cute and maybe taking pictures of it would be a good thing. So, Steph has been pulling things out of the box and photographing them, some on her daughter Anna, when they are the right size.


She's also been taking pictures of some of the dresses I've previously made for her.


Basically, what I've got is a box of cute stuff, access to a couple of cameras, and a friend with a kid we can put stuff on and model. We also have the internet, specifically, I have an etsy account. Hopefully, some of this stuff will end up there eventually. When I get time to make some listings. And yes, this is a cute kid. And yes, she has an older brother, and I make things for him too, it's just that they tend to be more Zorro and pirate themed items, not cute little girl dresses, which was more the subject of this post. Some other time, perhaps.
And thanks Steph and Anna for letting me use these pics!

Monday, August 2, 2010

50's with a twist


I like making these for some reason. Maybe it's because I love the fit and I can make them in cotton, which is washable. Maybe it's because they just look so classy in their 50's way. I will admit that when I wear mine with my sandle wedges, I suddenly go into cleaning mode, complete with the happy 50's music playing in the back of my head. What's more, I tend to enjoy it. Scary, no? But I digress.


I just like making these dresses. I made 4 of them before I posted the custom listing on etsy. And then someone wanted me to make one of these, with just a few modifications: she wanted it shorter, and with a bandeau style front. Shorter is very easy, of course, and it turned out that the bandeau front was fairly simple as well, once I made a mock-up. Essentially, I made the cups as usual, to provide a good backing to the bandeau. The bandeau was taken from a Simplicity pattern that had the top I was looking for. I had to fiddle with it a little bit to get the narrow hem (at the keyhole) in the right spot, and I cut each side of the bandeau about 1.5 inches longer than the pattern pieces so I would have enough fabric to work with. This is what I ended up with:


I like the skirt in the last photo here, because the light makes it look luminescent without being see-through. It's been packed up and put into the mail, now. I hope she likes it.


Sunday, July 18, 2010

Gold! (trousers)

Funny how just when I think about leaving town people all of a sudden want me to sew lots of things for them. The same thing happens at work on sunday at 4:15. Twice as many people come into the store as have been in there all day, wanting things. Ah well. Business is business, and plane tickets don't pay for themselves, so I might as well get down to it and use my time constructively.

One commission I have for this week is a pair of gold trousers. ... When I consider the things running through my head that I want to eventually put in my closet, I can't find fault with it (we just got in this new suede-finish silk fabric into the store that I want to make into a dress that I saw in The Duchess... You know, that blue one with all the fox fur? Wouldn't that be pretty if one could find a good substitute for real fox?) Sorry, shiney thing moment. Where was I? Oh, yes. Gold pants. They are going ok. I'm about half done with them at this point. They are going to be made out of liquid gold fabric, which is this knit stuff with a moderate amount of crosswise stretch, but not so much stretch in the length. The stretch is a small problem. The shiney side also sticks to the throatplate and the foot, and I'm scared to iron the stuff at more than a 3. To make it easier to handle, I am mounting the fabric on regular polyester lining fabric before sewing the pieces together. This will make the resulting garment a little more heavy, but will also keep it from being see-thru, as this stuff is wont to do.

So far, I have managed to put the pockets onto the fronts and install the zipper. That zipper is now sewn in seven ways to Sunday. If it falls out, there is something very wrong with the world. The size I need is between two sizes, so I'm making the larger size and plan to alter things down a little at the center back seam, and possibly through the pleats up front. All the pieces are serged finished so I won't have to worry about them going into the wash. I am leaving off the back pockets, partly because they will take some time to get right (I can do welt pockets. That doesn't mean I like doing welt pockets). Also, given the thin nature of the fabric, not having back pockets may help the garment hang better. And if I get things wrong, this fabric is very unforgiving and will leave holes if I rip out seams. Holes are bad.

At this point I need to sew darts in the backs, sew the backs to the fronts, sew the crotch seam, put on the waistband and hem the pants and I should be done. I should have some time tomorrow to get this done. So, hopefully tomorrow I can give the lady her gold trousers. Should be a good thing.

Saturday, July 10, 2010

Notes on a 10 year old corset


About ten years ago I was in a costume making class in college. Since I was already pretty good at sewing, I had my pick of what I wanted to do for a sewing project, and I was getting interested in corsets at the time, so this was a pretty natural thing for me to pick. For a pattern, I copied the 19th century corset out of The Little Corset Book and did a couple of fittings with muslins before cutting it out. The base layer is cotton coutil from http://www.farthingales.on.ca/ and the top layer is some sort of polyester satin that was in the stocks in the costume shop at the time. Sandy found me the black flat lace trim somewhere. The bones are white coated steel. I used commercially available single-fold bias tape to finish the top and bottom of the corset. I believe the grommets were also from Farthingales. I didn't follow any specific directions while making this. I made it 2 inches smaller than my waist, just as everyone tells you when you make one of these. It ends up being an underbust corset. I have worn it occasionally for the past ten years, for up to 8 hours at a time. It has been washed once, by hand. It is getting quite worn now, so I thought I'd post some pictures of where the worst of the wear points are.

It was not very long before the lace started to wear out and come off. You can see where it's worn out here on the front corner. The wear is especially bad on the knob side of the front:
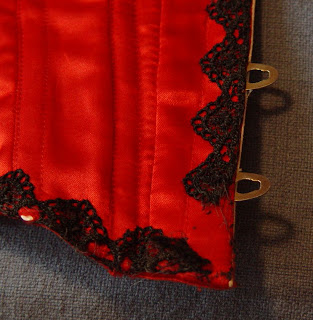
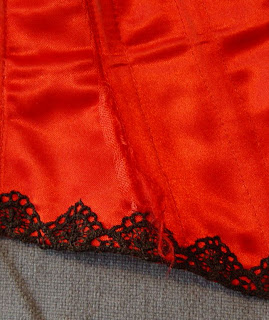
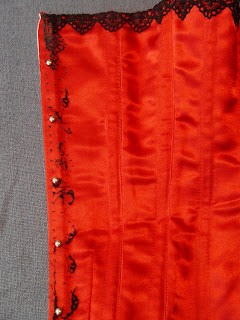
The lace has almost totally flaked off in small particles all the way down the knob side. Not sure why it's particularly bad in that spot, but the deterioration is particularly noticable, and started within the first year. You can see the place at the top of the corset on that side where the flaking first started, where I reembroidered it back in with some regular sewing thread during a particularly long read-through of a play I was in at the time:


One reason people tell you to make a corset at least 2 inches smaller than your measurements is that the corset will stretch. This certainly happened with mine, and the strain has created stress points at the sides of the bone casings. This is the worst one:

I have always had a particularly long lacing in it. After 10 years, the cord is still fairly intact, though not as shiney. There is some wear in the satin under the cord, and one or two of the grommets have started to pop:


When I made the corset, I assumed that a good way to finish the top was to bind the raw edge down to the inside with bias tape, so that's what I did. Unfortunately, that made the corset a little shorter than I wanted it. But, I sewed it down really securely, and it hasn't come out on its own in 10 years.


One drawback to binding the edge of the corset this way, and to using bones that were slightly too long, is that now a good number of them are popping out of the end of their casings:
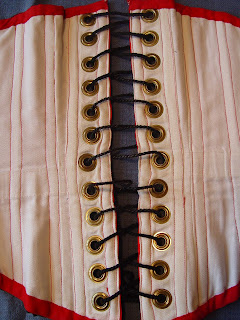
I did a slight alteration to it when I had my internship at the La Jolla Playhouse. Whenever I would wear it, the bottom of the front would flip up slightly. The ladies there suggested I put a dart in the front to help simulate a spoon busk. So that's what I did here. It does indeed keep the front from flipping up:
So, I suppose the best advice I can give for people thinking of making corsets is to keep the top fabric ever so slightly larger than the coutil, bind the raw edges over the top with double fold bias tape, stitch a dart in the bottom of the front, and don't make the bones too long.

Thursday, July 8, 2010

Something modern for a change

A friend of mine is attending a wedding in a month and I thought it might be fun to make her a dress. So, I perused the various pattern books at work and for some reason really liked one from Vogue (number 1104). It's from a modern designer (Anna Sui). It's not what I usually make or am drawn to, but I figured, what the heck, it's been a while since I've worked in chiffon, and I might just have all the materials I need for this anyway except the buttons. This is what I made:
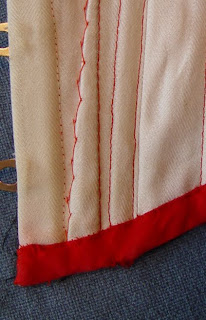
The only change I made to the pattern was to slash it near the bottom and add 2 inches to the length, otherwise the bottom ruffles would just barely have met the kneecap. The shell is silk chiffon, the ruffles are crinkle silk chiffon, the lining is silk lining fabric, and the buttons are shell. I cut it to a pattern envelope size 10.


Chiffon is difficult to work with, and I knew this beforehand. The twisted nature of the fibers means it tends to go everywhere on you, so I can't work with it when I'm hungry, tired or impatient, otherwise I'll somehow make the sewing machine suck it down into the bobbin housing where it will get covered with linty grease. This is especially true of the green I used for the ruffles, which is crinkle chiffon, and therefore twice as difficult to sew. The advantage of crinkle chiffon is that if the thing you make ends up being too big, you can point your steamer at it, and it will magically gather in all it's little pleats, making the item in question narrower.

The crinkle chiffon was difficult to hem on the ruffle parts, because they are circle cut and therefore have a lot of bias cut sections which are most unruly. When I put the edges of them through the serger set on a narrow rolled hem, the machine quite neatly sheared the edge off and ignored the fact that I actually wanted it to wrap the edge in thread. Even doing the traditional narrow hem resulted in a very wild, curling hem that I didn't like. So I ended up ironing the hem up, zig-zag stitching it on the fold, and trimming away the excess.


The belt came out fairly well on this. I was able to serge off the long strait edges to finish them. The ends I had to narrow hem the regular way because they were cut on the bias.


Overall, I don't think this was my best piece of work, and the materials were a pain in the rear to try to get them to do what I wanted. It took me a long time to get it made up reasonably well. It got some fabric out of my stash. I don't know if I or my friend will ever really want to wear it. It is, however, wearable on the right person I imagine that person to be tall with long legs and stunning hair.


Thanks for modelling the dress, Froggi!